It’s good to develop a routine when optimising your WordPress site for the search engines and easy to fall foul of over-optimising to the point where you mess up and I’m no exception to this rule, but you can have disastrous results if you’re not careful so backup, backup, #Backup and backup again until you have multiple backups in multiple places. In fact back up before you make any major changes.
I'd recommend All-in-One WP Migration as it's quite possibly one of the easiest backup plugins to use. I would suggest exporting your backup files locally however sometimes importing from local drives won't work on big sites. I have a workaround for All-in-One WP Migration import failures in this linked article. However something that is critical is not using more than one plugin for the WordPress cache.
I do all of my experimentation on my personal test sites using Local by Flywheel as I feel if it breaks it’s a little easier to fix, but it’s not so easy when you’re working on speed optimisations and constantly sending your site to gtmetrix.com to check the speed improvements of the WordPress cache that's well optimised.
You really need good upload speeds to do this and you also don’t want Google to index any additional test versions of your sites because if Google sees two sites with virtually the same content your page rank will drop. So in these instances it pays to just backup the site and be super careful. Also if it breaks and it’s a personal site of mine then it’s only me who has the hassle of getting it back up.
You also have to keep a track of what caching plugins you activating. That’s crucial because in some instances, activating more than one at a time can be disastrous. Breaking the WordPress admin and forcing a complete re-install or, if you’re more experienced some work in PHPMyAdmin on your database and playing with the database is not something the feint hearted and inexperienced should really do.
Yesterday I was working on improving my loading speed for a website of mine and had WP Super Cache running and as it was late and I was tired so I did what I really shouldn’t have done and activated the cache in WP-Optimize. Both great plugins and well written but I think they need to collaborate or at least co-operate to solve the following issue.
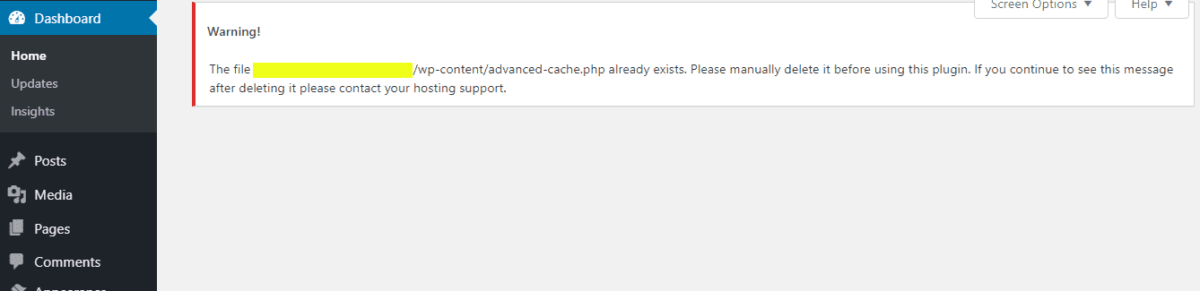
After turning on the WordPress cache functionality for WP Optimize I all of a sudden got a warning at the top of my admin area that disturbed the hell out of me. It really wasn’t good as every panel in the admin area had this warning and only this warning. And the very sad part about it was that I did what the warning told me to do and deleted the cache file but it persisted. Literally the site was broken.
I think it helps to understand what caching does and why it speeds up page load times for dynamic content based websites over the typical assemble on-the-fly database driven models of blog like WordPress, Joomla, Mambo, Concrete 5, Drupal etc etc.
When it comes to WordPress the WordPress cache is a way to bridge the gap of the convenience and ease of use of a traditional WordPress site and the rapid load and display of a hand coded HTML website loaded from flat text files. A cache is literally the latter built from the former.
In simple terms the cache plugin loads the site from the database and builds a text file version of that site and the software tells the server that it needs to set a preference to serve that text (cached) version of the website instead of building the HTML and the associated CSS that styles the pages from the database records.
This happens the first time the newly edited page is visited ideally and holds that copy of the page until it’s re-edited and the cache is cleared (either manually or after a period that it’s set top expire after).
So what happens when two plugins try to cache the page at the same time? I had no idea until last night when I slipped up. In hindsight the cache still remains but there is a conflict with another plugin trying to write to the cache and in the end it quite possibly becomes corrupt and needs to be rebuilt.
There is a potential solution to optimising the WordPress cache that I found on another blog but sadly it didn’t work for me and in the end I eventually went the long winded way about fixing it. Maybe my lack of success with the fix I found was because I was also caching the site on Cloudflare, however I deleted the Cloudflare cache and put it into development mode.
The unsuccessful solution was to delete the advanced-cache.php file (as the warning suggested) but then to turn off one of the cache plugins before doing anything else in the admin area. However I tried that and couldn't get into the admin area at all. The warning persisted on every admin page I went to and there was nothing underneath the message.
Here’s why backing up is so important. A good backup solution will also back up files like the WordPress cache. I use a backup solution every night with snapshots on my cloud servers and before I do anything crazy to the server I take a fresh snapshot. This is great for server wide disastrous changes as I could simply have restored from the snapshot I took that morning and I could have walked away happy.
Any changes made that day to any of the other websites on that server would have to be done again but at least the major issue of a site that couldn’t be accessed would be sorted out. However I think you’d agree that a solution like that is a little bit too drastic a measure for this level of issue and as I said, I use All-in One WP Migration before I do anything on a WordPress site.
...from my previously exported WordPress website using the All-in-One plugin.
This can be tricky and as you tend to get a little bit stressed and anxious when you encounter a new issue that seems unfixable and I’m no exception to this rule.
I went into Plesk (my control panel of choice) and deleted the entire subscription.
Cloudflare have a button in their cache controls to purge the cache. They have another one to put the site into Development mode which is basically there to stop you looking at a cached version of the site and to see the changes you make immediately. Here’s more information about Cloudflare development mode.
This part of the process is less specific as I already had a backup with all of the credentials of the original install in my All-in One backup. It will be different in CPanel or another control panel setup. Part of it was to choose the LetsEncrypt TLS certificate security option.
However you do this is unimportant but the next step is where we do the heavy lifting.
Download the free All- in One WP Migration plugin and the paid Pro extension. It’s a very good deal with no limitations and the license is for unlimited WordPress sites - All-in-One Migration Unlimited extension. Unless you have a site that’s under 20Mb then you won’t need the paid version.
Like I said it’s important to keep backups well away from the systems that you’re running the site on and also to keep backups of backups etc but in this case I had an issue.
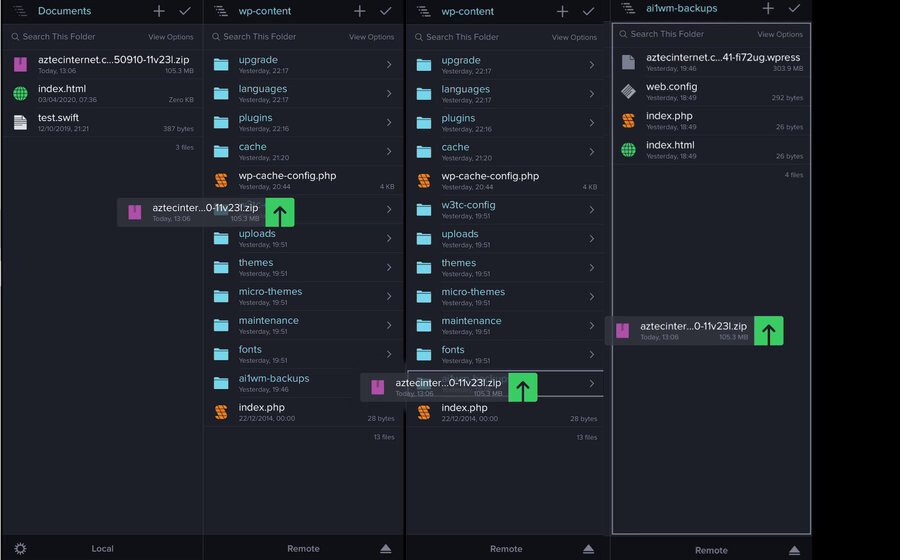
My site was over 300Mb and the process of uploading can get notoriously stuck importing from a local backup this big if you have any interruption in connectivity . So what I did is to drop the backup file into the /wp-content/ai1wp-backups/ directory via FTP and restore from a backup instead of importing from a file on my local machine.
I use Oxygen Builder which basically completely bypasses any theme you might have in place and allows your to start with a blank page and work from there.
What I found was that if I deleted the cache I was only getting the homepage. All other pages were missing. I wasn’t sure if this was because I had imported the site from a backup without signing the shortcodes. So I signed all my shortcodes (a clever addition that Soflyy added to Oxygen to harden the security) of their builder.
This was the penultimate step in the process for my website to finally re-appear. I was using Twenty-Seventeen theme and that’s all I had to test that my WordPress install would bring up pages again but one by one I hard refreshed the cache.
My menu came up on the first refresh with a page with no actual content but enough to see that it was doing something. Progress finally! I clicked on each link again one by one and each Twenty-Seventeen rendered page came up to the best of it’s ability.
I finally activated Oxygen builder and clicked on each page refreshing some with missing images and my site came up in all it’s glory. I’d lost nothing other than an hour’s messing about.
I hope this will help people with similar issues with the WordPress cache and remember, always take backups. YOU KNOW IT MAKES SENSE!!!
#OXYGENBUILDER
#TAKEBACKUPS
#WORDPRESS
#CACHE